Self Hosting a Ghost blog with docker-compose, Mailgun setup, and Stripe subscriptions
How to run your Ghost blog with docker-compose, set up Mailgun for mails, and stripe for paid subscriptions.

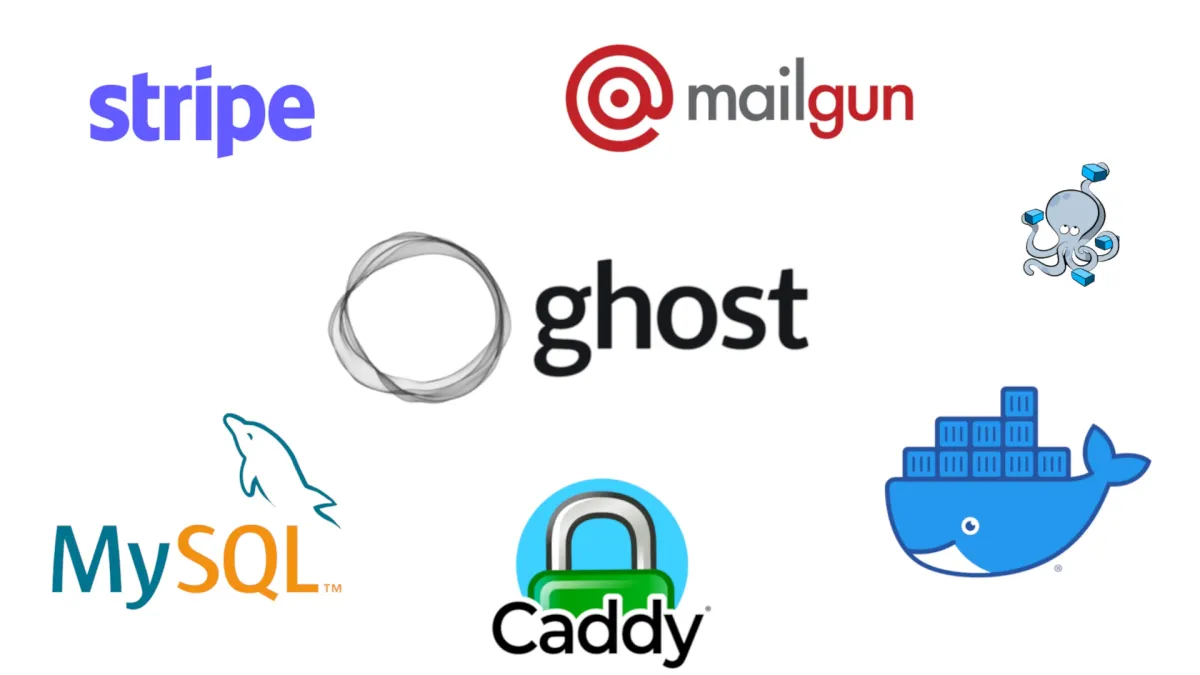
In this post, I will show you how to set up your own Ghost blog with docker-compose. We will also configure Mailgun for sending emails, newsletters, etc., and Stripe for Ghost subscriptions.
Let's start with Mailgun, since we need a few values from Mailgun for the .env file.
Mailgun setup
It took me a while to figure out the Mailgun setup with the DNS settings, environment variables, and having the right setting in the Ghost admin interface. Here is how I did set this up:
Create your domain
Go to Mailgun and add your domain. I recommend adding a subdomain like mail.example.com for your mails.
Setup DNS
First, you need to set up your DNS settings. That is the easy part. You can find this in Sending ➡️ Domain Settings ➡️ DNS records.
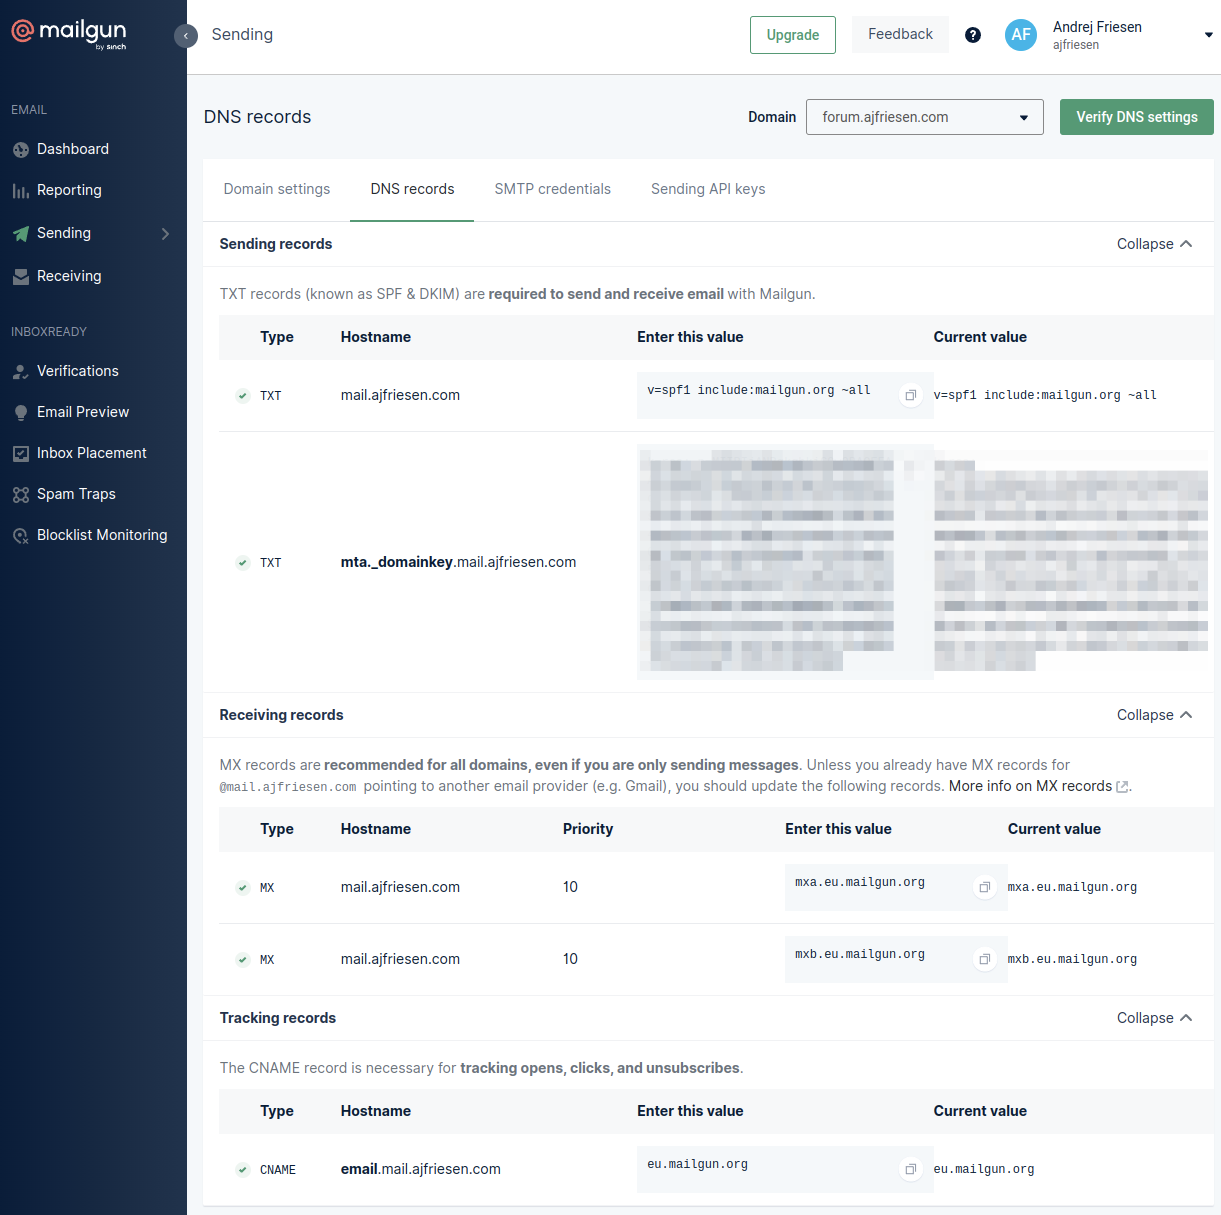
You have to check with your DNS provider how to set TXT records and a CNAME. On the Mailgun page, you can verify your settings. Since we are talking about DNS here it sometimes can take a day for these settings to get populated. So when creating these entries I recommend a short TTL like 300 seconds for testing. You can increase them later if you desire.
Get the SMTP password
This one is odd. To my knowledge, you can not see the existing password but you can just reset the password and then get the new value for a short amount of time.
Go to Sending ➡️ Domain Settings ➡️ SMTP credentials. Then click on Reset password and confirm.
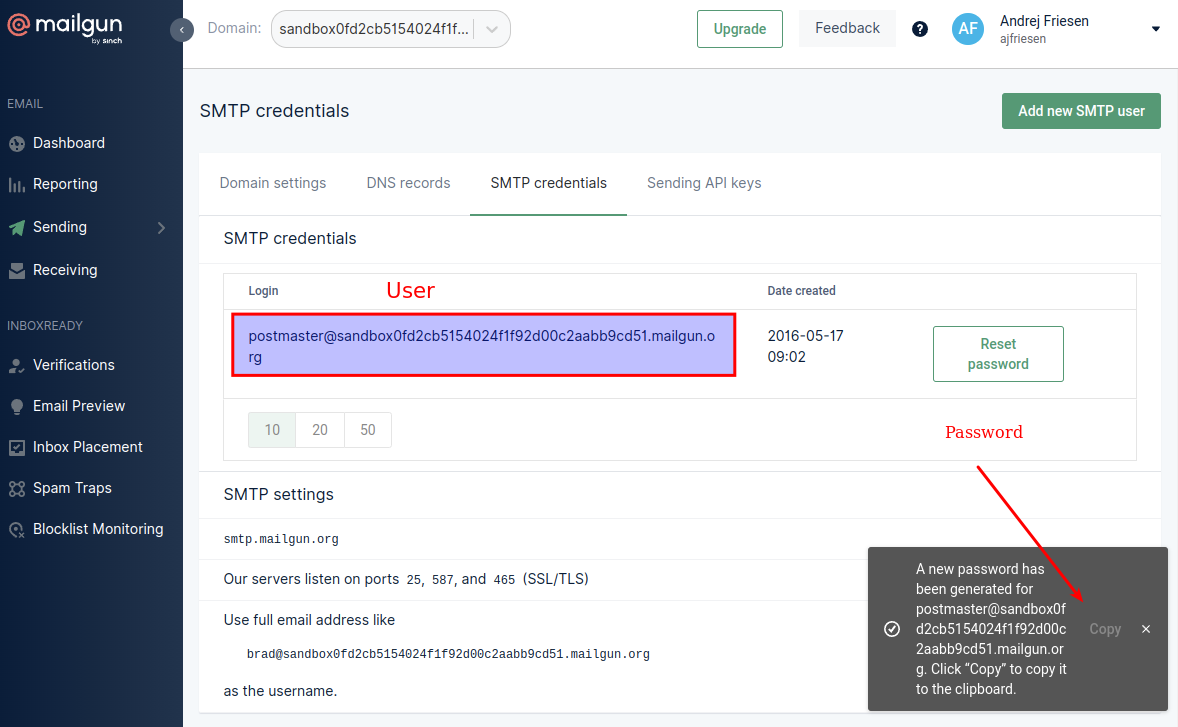
You can now get the password by clicking on Copy in the grey area. This user and the password need to be copied to the .env file for docker.
MAIL_USER=postmaster@mail.example.com
MAIL_PASSWORD=<MAILGUN-SMTP-PASSWORD>
part of .env
Lets get technical with the server setup
You will need some sort of Linux server. My server is running on Hetzner Cloud with Ubuntu 20.04. When you are just starting the smallest box should be fine.
You will also need docker and docker compose. Follow these instructions for installing those:
- Install Docker Engine on Ubuntu - Install using the repository
- Post-installations steps for Linux - Manage Docker as a non-root user
- Post-installations steps for Linux - Configure Docker to start on boot
- Install Docker Compose
Docker Compose Setup
We will be using 3 containers. Caddy as our webserver will take care of handling all requests to our Ghost instance and will also handle SSL certificates with Lets Encrypt automatically.
Ghost will do Ghost things. For the database and mail setup, we need a few environment variables and a volume. This volume is used for media files like uploaded images.
Ghost will link to db which is a MySQL 8. Ghost officially supports MySQL 8 and also will drop MySQL 5.7 support in Ghost 5.0 when this is released. Just go with version 8.
services:

  caddy:
    image: caddy:2
    restart: always
    ports:
      - "80:80"
      - "443:443"
    volumes:
      - $PWD/Caddyfile:/etc/caddy/Caddyfile
      - caddy-data:/data
    networks:
      - docker-network

  ghost:
    image: ghost:5
    restart: always
    environment:
      # see https://ghost.org/docs/config/#configuration-options
      database__client: mysql
      database__connection__host: db
      database__connection__database: ghost
      database__connection__user: ghost
      database__connection__password: "${MYSQL_PASSWORD}"
      url: www.example.com
      mail__transport: "${MAIL_TRANSPORT}"
      mail__options__host: "${MAIL_HOST}"
      mail__options__port: "${MAIL_PORT}"
      mail__options__secureConnection: "${MAIL_SECURE_CONNECTION}"
      mail__options__auth__user: "${MAIL_USER}"
      mail__options__auth__pass: "${MAIL_PASSWORD}"
    volumes:
      - ghost-data:/var/lib/ghost/content
    links:
      - db

  db:
    image: mysql:8.0
    restart: always
    environment:
      MYSQL_ROOT_PASSWORD: "${MYSQL_ROOT_PASSWORD}"
      MYSQL_DATABASE: ghost
      MYSQL_USER: ghost
      MYSQL_PASSWORD: "${MYSQL_PASSWORD}"
    cap_add:
      - SYS_NICE
    volumes:
      - ghost-db:/var/lib/mysql

volumes:
  ghost-data:
  ghost-db:
  caddy-data:
docker-compose.yaml
Configure environment variables
Docker and .env variables are a typical setup for using secrets. You can read more about Environment variables in Compose on their documentation. Basically the variables you have set up in the docker-compose.yaml like mail__options__auth__pass: "${MAIL_PASSWORD}" can do the actual value lookup here. Treat this file as a SECRET!
MYSQL_ROOT_PASSWORD=<YOUR-MYSQL-ROOT-PASSWORD>
MYSQL_PASSWORD=<YOUR-MYSQL-PASSWORD>
#mail
MAIL_SERVICE=Mailgun
MAIL_TRANSPORT=SMTP
MAIL_USER=postmaster@mail.example.com
MAIL_PASSWORD=<MAILGUN-SMTP-PASSWORD>
MAIL_HOST=smtp.eu.mailgun.org
MAIL_PORT=587
MAIL_SECURE_CONNECTION=false
.env
Caddy configuration
The Caddyfile is really simple. Adjust your domain and email and PLEASE uncomment line 6 with acme_ca https://acme-staging-v02.api.letsencrypt.org/directory for your first test.
This setting will tell Caddy to use the Lets Encrypt staging environment. As long as you figure things out it is a good idea to use this because otherwise, you might get rate limited by Lets Encrypt and will not get your certificate for a long time. This will not happen with the staging environment.
{
    # Global options block. Entirely optional, https is on by default
    # Optional email key for lets encrypt
    email your-mail@example.com
    # Optional staging lets encrypt for testing. Comment out for production.
    # acme_ca https://acme-staging-v02.api.letsencrypt.org/directory
}

www.example.com {
    reverse_proxy ghost:2368 {
        lb_try_duration 30s
    }
}

example.com {
    redir https://www.example.com{uri}
}
Caddyfile
Bringing things up
After you have created your Linux server, installed docker and docker compose, adjusted and copied the files to your server thing should look like this:
root@webspace:/home/andrej/blog# tree -a
.
├── .env
├── Caddyfile
└── docker-compose.yaml
Now you can just run docker compose up -d to bring up all containers. If you have any issues you can follow all logs with docker compose logs -f.
Your site should be up and running, check your browser! If everything works remove the Lets Encrypt staging settings in the Caddyfile and run docker-compose up -d again.
Mailgun API key in Ghost
Now we will finish the Mailgun setup. You have to go to your Ghost installation and then to Settings ➡️Email newsletter ➡️ Mailgun configuration.
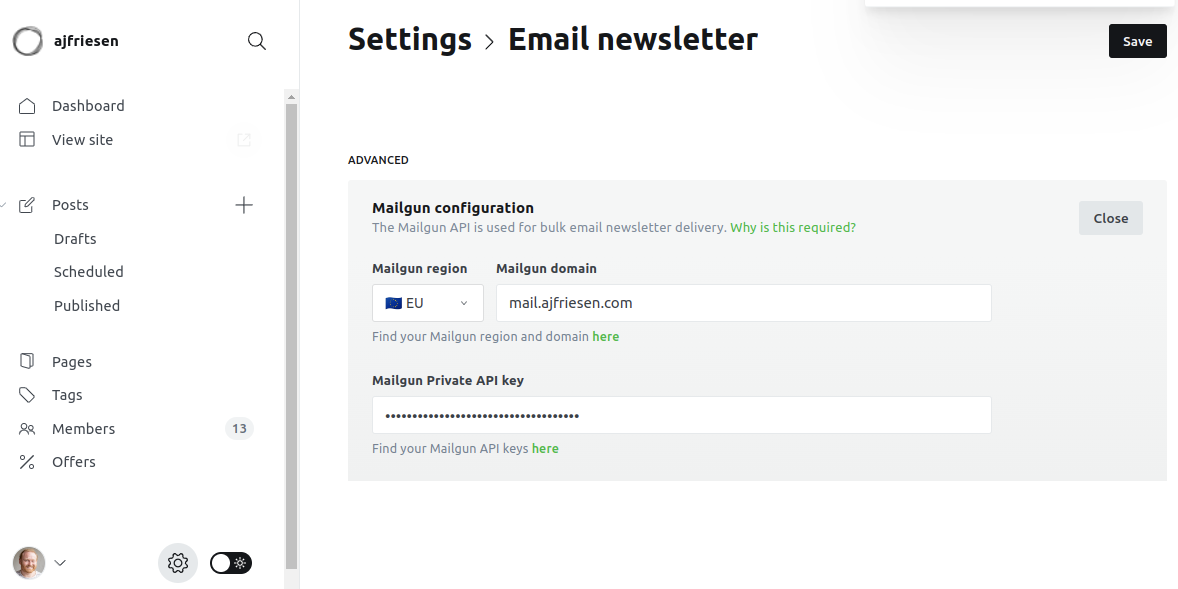
Set your domain and use the same domain you have set up your Mailgun account with. Choose your region and be careful to use the same region in the .env file as well:
MAIL_HOST=smtp.eu.mailgun.orgpartial .env
If you are in the US you have to change them both accordingly.
Retrieving the API key is easy. Just follow the link under the field.
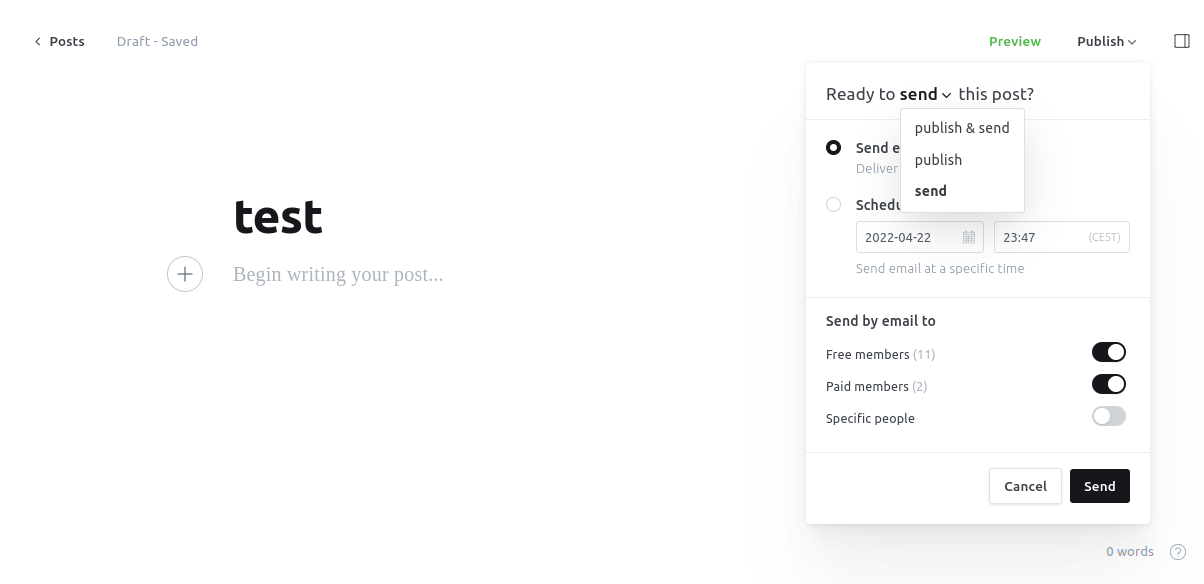
Testing your mail setup
In order to send a test mail, you can add yourself as a member in the Members area. Create a post and make it a send only post as shown in the picture below:
Stripe setup
The Stripe setup is actually a breeze.
- Create a stripe account
- Follow the form to register your company or whatever entity you are
- Follow the Ghost + Stripe integration documentation

That is it.
That was the general overview on how to get your blog going. I think I will follow up on these.