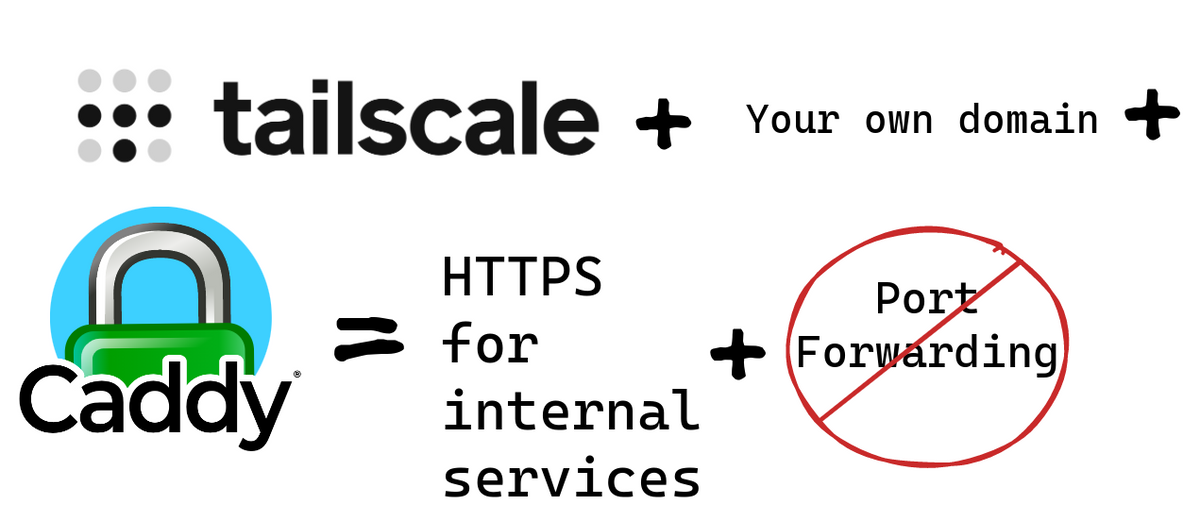
Tailscale to the Rescue - Self-Hosted Services without Port-Forwarding + your Domain and SSL Certificates
Learn how to access your self-hosted services outside your home network. With HTTPS, your own domain and share that with you friends, SO.

So, I am running a few self-hosted services. And sometimes I really want to access them when I am not at home.
The usual route - Port forwarding and DynDNS
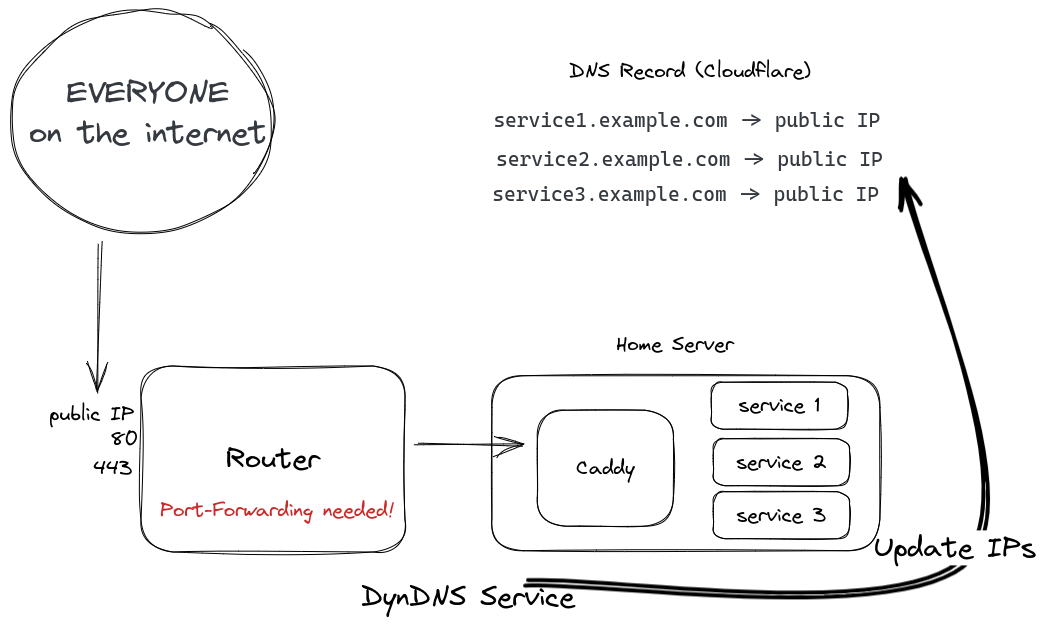
Usually, you would set up some kind of DynDNS to get your public IP to your DNS provider. That can either be set up on your router or home server. That already gets a bit more tricky with IPv6 since each device has its own IPv6.
Afterward, you will create a port-forward to some kind of web server which will then proxy the traffic to your desired location. Since everything is available on the internet you can create an SSL certificate pretty easily with an HTTP challenge.
And that is only possible when you actually have a real public IPv4 and IPv6. If you are behind CG-NAT (Carrier-Grade NAT) then you are out of luck.
The secure alternative with Mesh VPN
Now, let's look at a different solution. My requirements for this setup are:
- No Port-Forwarding (No public access whatsoever)
- My SO is able to use the service as well
- I want to use my own domains (I can NOT remember all those ports 😅)
- Works with CG-NAT (I do not have CG-NAT, I assume it will work though)
They are working on this feature, but until now you have to use your own domain if you don't want to remember all those ports.
Tailscale to the rescue.
Tailscale is a Home Labbers dream. That is a fact 😉
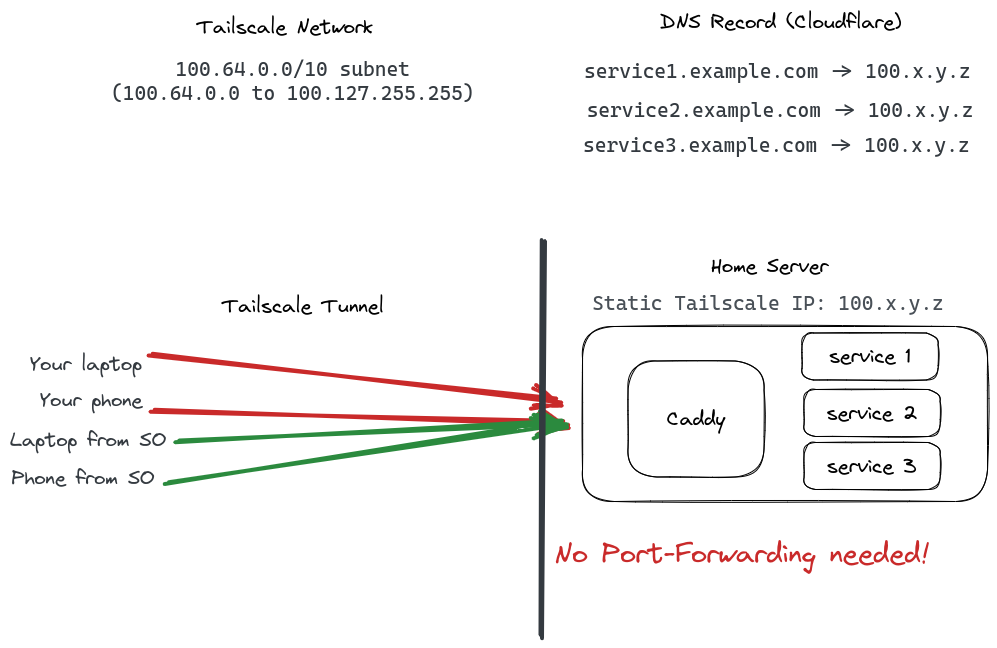
With Tailscale every node on your network gets a static IPv4 from the 100.64.0.0/10 range. That is from 100.64.0.0 - 100.127.255.255. And a static IPv6 address as well from fd7a:115c:a1e0:ab12::/64.
Now you can create DNS entries for all your services to that static IP from your home server. These are not publicly routable. In order to obtain a TLS certificate you can not use the HTTP challenge anymore. But luckily we have the DNS challenge to obtain a TLS certificate.
The DNS challenge is a programmatic way to obtain a certificate via API from your DNS provider. I am using Cloudflare for my DNS since it has really great API support. My web server of choice right now is Caddy.
Add DNS entries
So now go to your Cloudflare interface or some other provider and enter your domains with the IP of the Tailscale node you want to have access to.
Caddy, Cloudflare, docker compose setup
Let's first create the Dockerfile for Caddy. Caddy does not ship with ALL the DNS provider plugins enabled. That keeps the size down. But now we have to build our own Caddy. Do not worry, it is super easy.
Dockerfile for your cusotm Caddy container
ARG CADDY_VERSION

FROM caddy:${CADDY_VERSION}-builder AS builder

RUN xcaddy build \
    --with github.com/caddy-dns/cloudflare

FROM caddy:${CADDY_VERSION}

COPY --from=builder /usr/bin/caddy /usr/bin/caddy
We will use the CADDY_VERSION when creating the docker-compose.yaml. As you can see, I am adding github.com/caddy-dns/cloudflare . If you do not use Cloudflare you can check the Caddy modules to find your DNS provider: https://caddyserver.com/docs/modules/
Docker Compose setup
Okay, now let's have a look at my docker-compose.yaml. Here we can utilize the Dockerfile from earlier and specify the version.
version: "3.3"

services:
  caddy:
    container_name: caddy
    build:
      context: .
      dockerfile: Dockerfile
      args:
        CADDY_VERSION: ${CADDY_VERSION:-2.6.4}
    image: caddy:${CADDY_VERSION:-2.6.4}
    restart: unless-stopped
    env_file:
      - .env
    volumes:
      - ./data:/data/
      - ./Caddyfile:/etc/caddy/Caddyfile
    healthcheck:
      test: ["CMD", "curl", "-f", "http://localhost:80"]
      interval: 5s
      timeout: 1s
      retries: 3
Configuring Caddy
Let's have a look at the Caddyfile. You just need to use YOUR_LOCAL_IP in the service1.example.com block.
# globally
{
  # debug
  email YOUR_MAIL@example.com
}


(cloudflare) {
  tls {
    dns cloudflare {env.CF_API_TOKEN}
  }
}

# Tailscale

service1.example.com {
  reverse_proxy YOUR_LOCAL_IP:8096
  import cloudflare
}
Cloudflare Token Set Up
The Cloudflare token can be created here: https://dash.cloudflare.com/profile/api-tokens
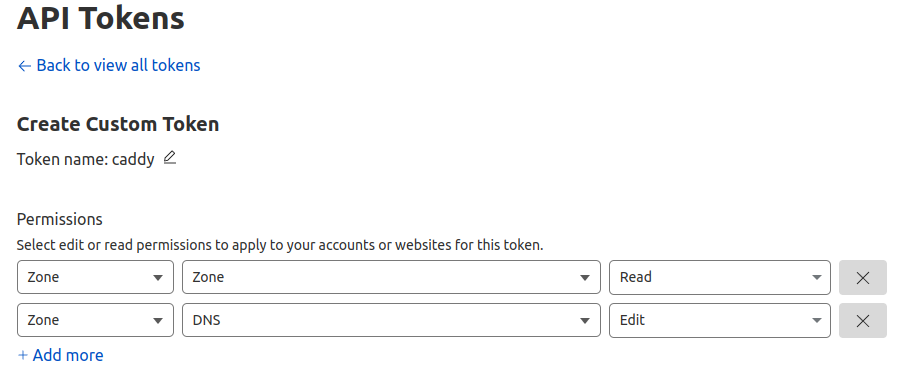
Be sure to check the following permissions:
- Zone.Zone: Read
- Zone.DNS: Edit
Now add this token to you .env file:
CF_API_TOKEN=YOUR_CLOUDFLARE_TOKENA simple docker compose up will now build and start your Caddy server. After a while, the service should get a TLS certificate. To test this I would recommend setting up Tailscale on your phone and disconnecting from WiFi. Then browse to your desired service domain.
If you have problems, enable the debug log option in the Caddyfile for easier troubleshooting.
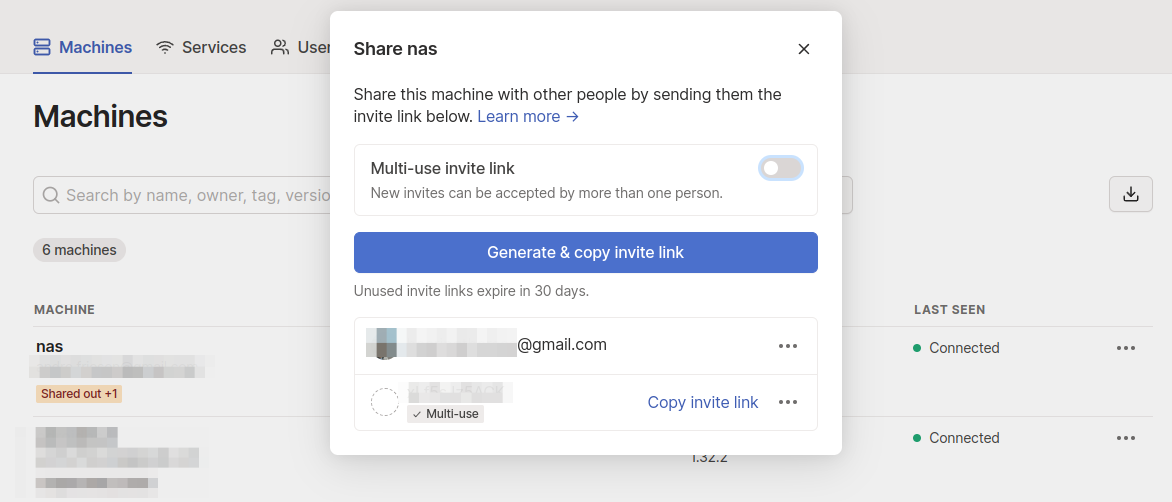
Share your private service
For now, only you, the Tailscale admin has access to these services. That might be everything you wanted.
However, I wanted my SO to have access to these services as well. You can just do that. Creating an account with Google is easy enough and then letting the SO join the machine with machine sharing here: https://login.tailscale.com/admin/machines
That is all my fellow nerds!
❤️That is it for today!❤️
I hope I could help you to set up a more secure way to access your services on the go.
If you have friends who are using port-forwarding, you HAVE to FORWARD this to them! Also don't forget to sign up here to get more content like this.
Have a great day!